


Choosing the right gift for a loved one is really an art form, and I’m no master when it comes to grown-up gifts. I mean, kiddos are usually an easy crowd to please, right? Just aim for their most beloved TV shows, superheroes or princesses, throw in a few building blocks, and you’re golden. But when it comes to grownups, I start breaking a sweat. Most of the people I know have very specific tastes and styles, and they’ve already accumulated quite a bit of … stuff. Coming up with a thoughtful gift that hits the mark is quite a challenge.
As a true craft lover, I believe handmade presents are best, but they have to be a perfect match for the intended recipient. After years of searching, I’ve finally cracked it: the holy grail of personal, customized, handmade gifts.
Here’s how it happened: Two weeks after my eldest son was born came my husband’s birthday. With little sleep and no energy to leave the house, I had to find a gift that’s easy to make and beautiful to have. All I ended up making is a simple mini album with a few photos of our newborn baby. That basic album became one of my husband’s all-time favorite items, moving with him from one office to another, always proudly presented on his desk. The simple truth is that photos are the best gift ever. Whether it’s vacation adventures, a spring wedding or your amazingly funny kids. those captured memories put on display are the most heartwarming gifts there are.
For Father’s Day, I really wanted to make another photo-related gift for my husband (but note, this gift is great for any holiday!). I wanted an exciting way to capture the funny faces our kids make. He’s been working so hard lately, and this would be a great pick-me-up. The gift had to be pretty enough to display, and it had to be awesome because we’re making only cool things around here!
Inspired by the work of the artist Yaacov Agam, I came up with this design of a photo display that changes its appearance as you walk by. It’s actually pretty simple to make, and that fun, surprising effect could make anyone a little extra-cheerful.
MORE: How to make a trendy straw purse for cheap
What you need:
- 3D frame pattern
- Heavy card stock: solid, textured or patterned
- Stylus, butter knife or paperclip
- Masking tape
- Ruler
- Craft knife
- Cutting mat
- Acid-free glue
- 2 vertical photos, 4 inches by 6 inches each

Step 1:
Download the frame’s printable patterns (links below) and print. Make sure your printer’s set on 100% scale, so it won’t shrink or stretch the file. If your printer can handle thick paper, you can print straight onto the card stock. (Be sure to print on the back.)
Step 2:
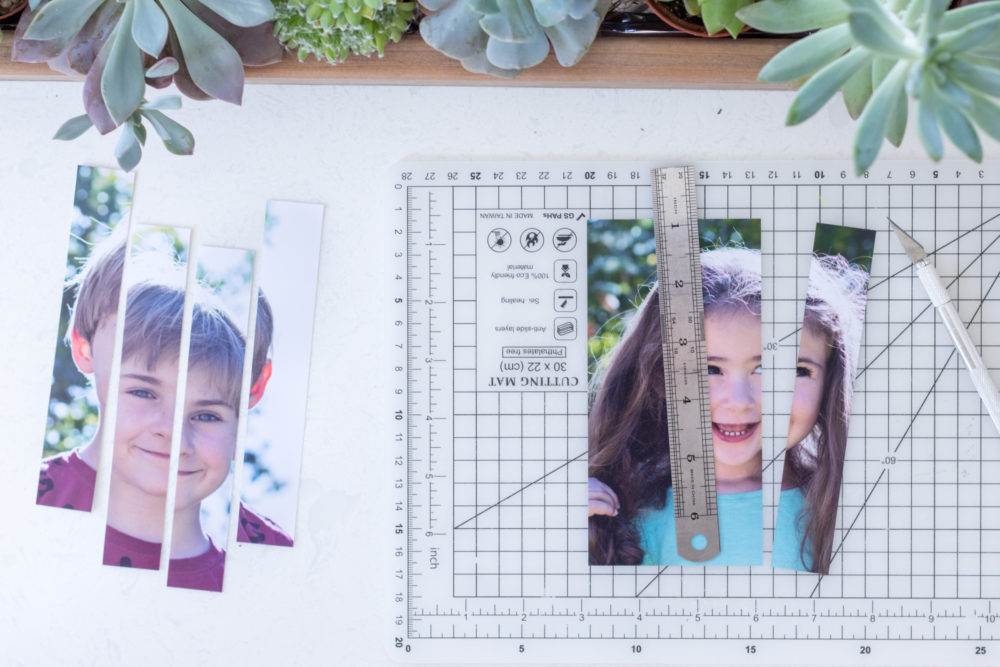
Using a craft knife or trimmer, cut the photos down vertically into 1-inch strips. Keep them organized in the right order. To simplify things, we’ll call them photo A and photo B.
Step 3:
With a knife or scissors, cut around the pattern. No need for accuracy — just make sure to cut away from the pattern’s actual lines. We want that frame around it. Tape the pattern to the card stock.

Step 4:
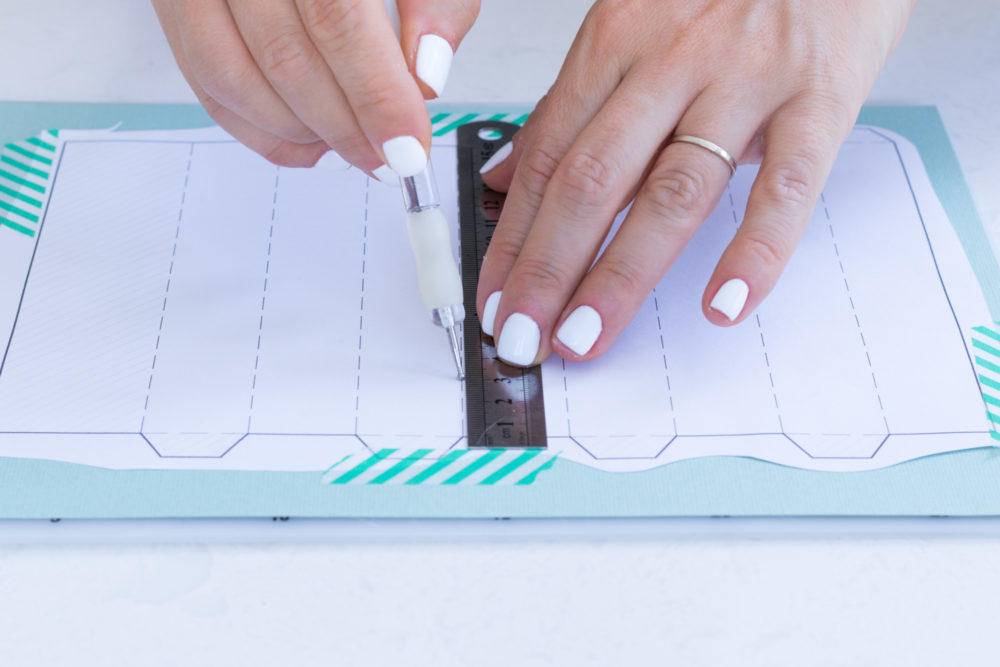
Use a stylus, the back of a butter knife or even a paperclip, score the folding lines. Following the dashed lines, set the ruler and run the tool along the line while applying pressure.
Step 5:
Using a craft knife and a ruler, cut around the shapes. A self-healing cutting mat is your friend! it makes cutting a lot easier. You can use scissors if sharp knives make you a little uncomfortable, but a knife will make this process faster and more accurate.


MORE: Make your own patriotic towel for beach days
Step 6:
Fold all the dashed lines that you scored. Notice that the base and walls of the frame, including the gluing tabs, are all folded inward.


Step 7:
The large piece that will carry the photos is folded inward and outward, zig-zag style. To find the starting point, look for the large rectangular gluing tab on one end of the piece (tinted grey on the pattern). Start on the opposite end. Begin the zig-zag pattern with a mountain fold, then a valley fold, mountain fold again and so on. When you’re done, fold inward all the little gluing tabs on the top and bottom of the piece.


Step 8:
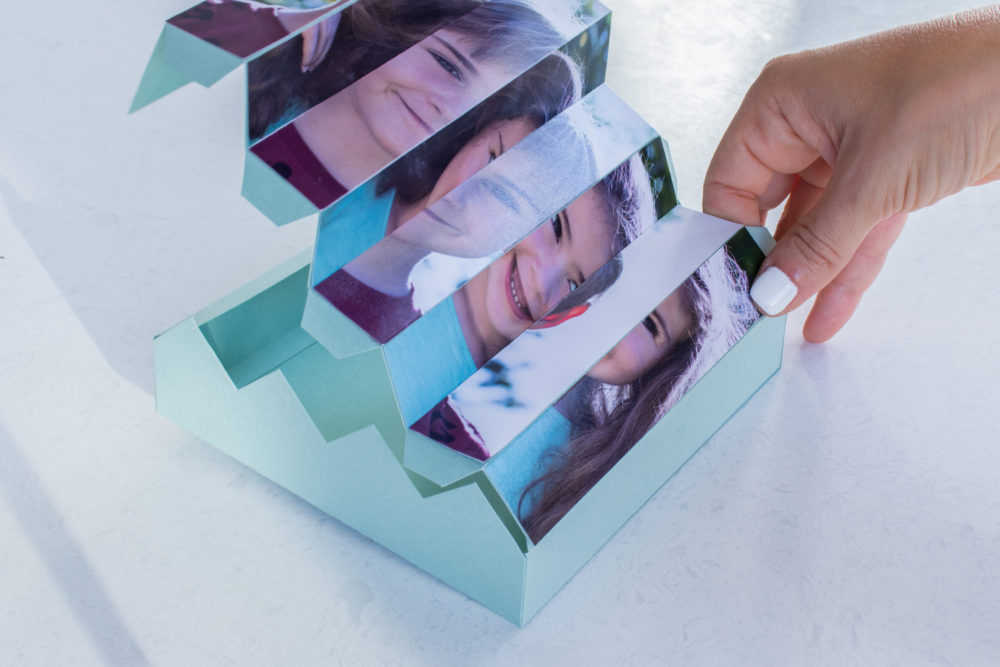
Using acid-free glue, adhere the photos alternately to the accordion-style paper. Here’s how: On the first column, glue the first strip of photo A. On the second column, glue the first strip of photo B. On the third column, glue the second strip of photo A and so on, until you’re done laying all eight strips. Remember the large gluing tab on the end of the zig-zag base? Make sure not to apply glue to it yet.


Step 9:
Using the two narrow pieces (soon to be the frame’s walls), add glue to three of the four gluing tabs and attach them to the base of the frame. You’ll end up with this 3D open box.


Step 10:
Apply glue to the wall’s free tab. Attach the zig-zag piece to that tab, just where the first strip of photo A is.

Step 11:
Moving one by one, up and down, up and down, gradually glue all those little tabs into place. Just add a little bit of glue and tuck it in.


Step 12:
To finish the frame, just apply glue to the frame’s wall at the end. Lay the large gluing tab on top of that wall, and smooth it out.

MORE: DIY painted denim jackets are in — here’s how to do it
You can make all sorts of cool combinations with this frame: black and white, colourful, serious face vs. goofy one, an amazing then-and-now comparison… The possibilities are endless, and the result is a beautiful, personal gift.


Before you go, learn how to draw like a pro from a comic artist:
Share your DIY 3-D photo frames with us by tagging @HomeOfTheHolidays and #Holidays365. We can’t wait to see them!