


Attention, readers! The holiday trifecta (or quadfecta) is upon us! Time to whip out everything you own that is related to fall and get ready to celebrate the whirlwind of months that begin with Halloween, give you a toothache until Thanksgiving, stuff you until Christmas and then dazzle you until NYE. To celebrate the first of these holidays, we’ve created five different cake toppers you can make for Halloween with supplies around your house.
Five seems like a lot, but don’t worry — you don’t need to (but could) put them all on one cake. We’ll walk you through steps on how to make an easy cake topper in under five minutes as well as more complicated cake toppers that will take a little more effort. What we love about all five cake toppers is that they are all made with pieces you can most likely find around your home. So no excuses for a boring cake! Let’s get to making.
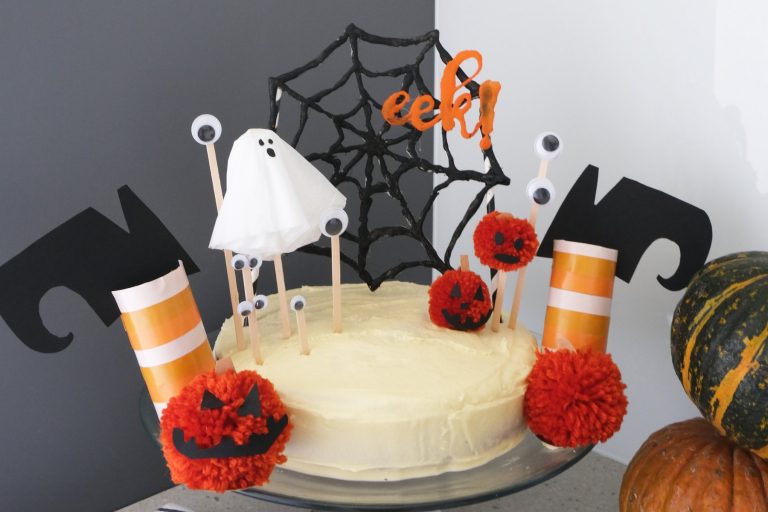
Googly-eyed forest cake toppers — easy
Materials
- Wooden sticks
- Googly eyes
- Hot glue

Step 1
This is a one-step wonder. Simply glue googly eyes onto wooden sticks and you are done. What makes this cake topper interesting is varying the type and amount of googly eyes you glue onto each stick. Glue some horizontal, vertical, eight on a stick, one on a stick — go crazy with it!

You will then want to put them into your cake at different heights. Make the googly eyes appear from all different angles. Just as if creepy crawly creatures were lurking in bushes and all you could see was the glow of their eyes.
MORE: Use our Halloween party checklist so you won’t forget a thing
Ghost cake toppers — relatively easy
Materials
- Cotton balls
- Tissues
- Black paper
- Wooden sticks
- Scissors
- Hot glue gun

This isn’t as easy as the first one, but this Halloween cake topper still only has three steps.
Step 1
Glue the cotton ball onto the top of the wooden stick.

Step 2
Cover the top of the cotton ball with hot glue and stick it in the center of the tissue. Use your hands to press the tissue down so it drapes over the cotton ball. You might need to add a few extra drops of glue on the inside to hold the tissue in place and create a nice ghostly draping effect.

Step 3
Cut out small circles of black paper for the eyes and mouth, and glue them onto the face of the ghost.

Ghosts are always more fun in a group, so make a couple to top off your Halloween cake.
Witch leg cake toppers — medium
Materials
- Toilet paper tubes
- Orange paper
- Yellow paper
- White paper
- Black paper
- Scissors
- Glue

Who doesn’t love a good toilet paper tube hack?
Step 1
Cut out strips of orange, yellow and white paper, and glue them onto the toilet paper tube. I used colored contact paper, which made it a breeze, but isn’t necessary to buy if you don’t have it around. You could also use colored tape — duct tape or washi tape.
MORE: Healthy pumpkin spice latte recipe
These tubes will be the witch’s legs — a witch wearing striped stockings.

Step 2
Draw and cut out two witch’s shoes from black paper. I used a Google image as a reference to look at a witch shoe while I was drawing.
Step 3
Cut two 3/4-inch slits at the top of the toilet paper tube and slide the cut-out shoe to sit at the top.

Step 4
Place the witch’s legs sticking out of the top of the cake and you have an adorable Halloween cake topper.

Pumpkin patch cake toppers — medium/difficult
Materials
- Orange yarn
- Black paper
- Wooden sticks
- Pom-pom maker
- Hot glue gun

Step 1
Wrap yarn around both sides of your pom-pom maker until the sides look full.

Step 2
Cut down the center of each side and then wrap an extra piece of string through the middle. Tie tightly and then release from the pom-pom maker.

Step 3
Trim up the pom-pom to look like a pumpkin. The more you trim off, the more dense your pom-pom will look.
Step 4
Glue your pom-poms onto the top of a wooden stick, or you can glue a piece of cardstock to the bottom of the pom-pom if you want it to sit directly on the cake. No one wants to mix yarn and frosting.

Step 5
Cut out small shapes from black cardstock and glue them onto the pom-poms to create Jack-o’-lantern faces.

Not your typical Charlie Brown pumpkin patch. Take this cake topper to the next level by adding candy corn and candy corn pumpkins around the edges.

Spider web cake toppers — difficult
Materials
- Spider web print-out
- Eek print-out
- Wax paper
- Hot glue
- Paint
- Hot glue gun
- Striped straws

Step 1
Print out an image of a spider web and cover it with a piece of wax paper. Trace over the spider web with your glue gun, leaving behind a spider web made out of hot glue. You will want to make sure your web has thick lines and good connections, because you won’t want it to break when assembling the cake topper.

Step 2
Follow the same steps with your lettering. You can choose any word or phrase, but make sure your stencil is in script lettering. You will want all the letters to connect to make it easier to attach to the web.

Step 3
Once the glue has dried (which should be pretty instant), peel it off the wax paper and remove all the extra hot glue strings. You can also use an X-Acto knife to trim up the edges if your hot gluing got out of hand.
Step 4
Paint over your hot glue pieces with acrylic paint. You will probably need two coats of paint to get a good covering.

Step 5
Time to assemble your cake topper. Glue the spider web to two straws and then place the lettering on top of the spider web. Stick it on top of your cake and no one will ever know this was made from hot glue!

And if you are making all five, then you might as well put them all together into one crazy cake topper.
Looking for a way to decorate Halloween cupcakes with 100 percent edible ingredients? We’ve got three different design tutorials in the video below.