


I’ve always been intrigued by dishes that take something pretty simple and turn it into a show-stopping dish. Onion blossoms (aka. the bloomin’ onion) are no different. They remind me of the cooking competition shows when they ask for dishes to be elevated. What’s more elevated than onion rings evolving into a flower?
Before we get started, what tried and true tips work for cutting onions? Running them under cold water first? Chewing gum as you cut? As someone who has always teared up from sliced onions, even if I’m not the one cutting them, I’m happy to report running it under cold water first definitely did the trick! And, for what it’s worth, I also noticed the greener the onion was, the more likely it was to cause tears if I forgot to run it under cold water.
As you get started, this dish seems to come down to making the right cuts. First, take the non-root stem of onion and cut flat, so you can sit it upside down. This cut is the most crucial to the petals opening later, so don’t skimp. Take at least a half inch off of the non-root end and then peel the onion.
MORE: Our healthier, low-carb Twinkie recipe is a dessert lovers dream
Once it’s peeled, place it cut-side-down. Make 4 cuts, roughly half an inch from the root, down to the cutting board. Go back through the 4 cuts and cut in half, making 8 sections. Repeat with the 8 cuts, doubling to 16. If you’re working with a smaller onion, take the initial 4 cuts and cut thirds, so you end up with 12 cuts instead of 16. Honestly, the cutting seemed intimidating (there’s an actual onion blossom cutter you can buy!) but was the easiest part.
How to make a healthier bloomin’ onion
What you’ll need:
- 1 large yellow or sweet onion
- 2 cups flour
- 2 eggs beaten
- 1 cup milk, water or beer
- 2-1/2 teaspoons paprika
- 1-1/2 teaspoons garlic powder
- 1 teaspoon pink Himalayan salt
- 1/2 teaspoon black pepper
- 1/2 teaspoon cumin
- 1/4 teaspoon ground mustard

Once you have your cuts, gently flip the onion over and separate the cuts to make distinct petals, ensuring they get breaded in between. Get the breading down as far into the petals at the base as you can. It will help later. Some recipes will tell you to pull out the center of the onion. Others don’t mention it. If it’s not a big enough onion to really serve dipping sauce in the middle of, it isn’t worth the risk. It’s safer to pull it out at the end, if you really wanted to.

In two separate shallow bowls, make the egg mixture (whisking together egg and your preferred liquid) and flour mixture (whisked together with the seasoning).
Here’s something I learned the hard way: You want your egg wash very wash-y, if that makes sense. Make sure you use enough liquid to make it thin. Too many recipes out there leave it heavy on the egg, light on the liquid. That’s a mistake. Also, if you’re using higher-quality eggs, they’re naturally denser, leaving it on the thicker side. If it’s too thick coating the petals, it won’t separate by petals like it needs to, and you’ll have some larger chunks of onion breaded together.

First, place the onion into the flour mixture to lightly coat, cover with a plate and lightly shake to make sure it gets in between the petals. You can also use a large Ziploc bag and do some light shaking when sealed. Or use your hands to get in between the petals. Then, shake off any excess flour. Place on a plate, petals-up, in freezer for 5-10 minutes to firm up.
Submerge into egg mixture and use a spoon to make sure it gets well-coated, and then let excess drip off. You’ll need to use the spoon to separate the rings of petals sticking together in one place. Again, it all needs to coat as separately as possible. Turn petal-side-down and lightly shake off excess egg wash.
Then return it to the flour mixture one last time for a final coating, using a spoon or your hands to sprinkle mixture over the blossom. Make sure it gets in between petals, especially at the base, to help keep them separated. Put back on plate, petals up, and stick in freezer for 30-60 minutes. As onions are naturally soft, you’ll need them harder before cooking.
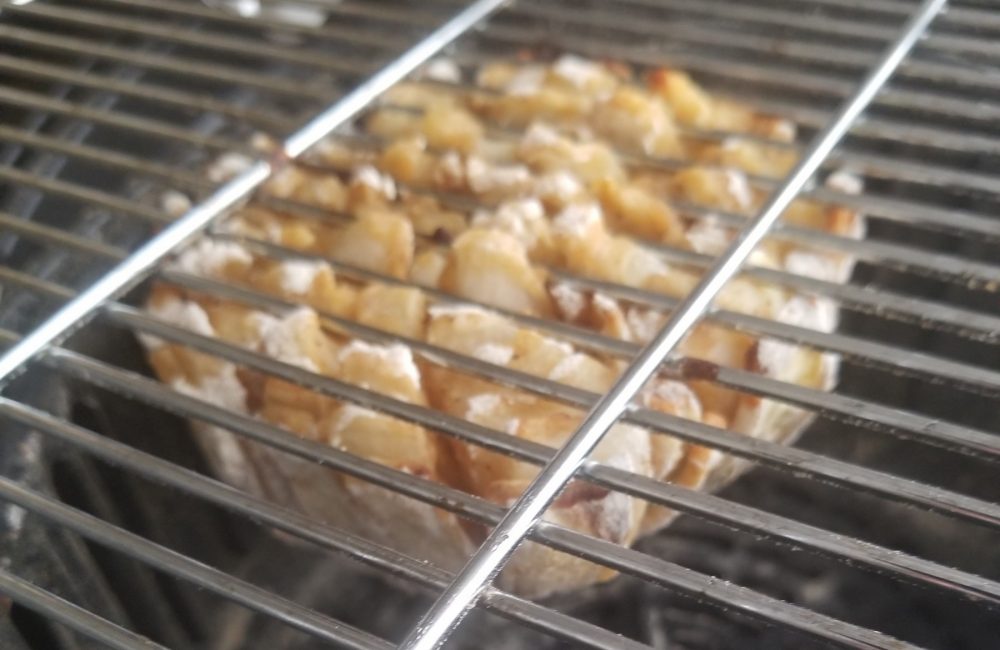
Once you take it out, shake off the excess flour one more time. Spritz the onion with a light oil. Place into air fryer basket, petal-side-up, and air fry until crisp. While frying petals-down makes sense, it’s only going to cause it to clump back together.
MORE: How to make cauliflower wings 3 ways
Cook at 375 degrees Fahrenheit for 10 minutes. Check on it, covering with foil if it’s browning too fast. Then cook for an additional 7-15 minutes, until crispy. You could turn the temp higher for a shorter cook time. But because of how tedious the process can be, slow and steady wins this race.

Healthier bloomin' onion recipe
Yield 1 onion
Ingredients
- 1 large yellow or sweet onion
- 2 cups flour
- 2 eggs beaten
- 1 cup milk, water or beer
- 2-1/2 teaspoons paprika
- 1-1/2 teaspoons garlic powder
- 1 teaspoon pink Himalayan salt
- 1/2 teaspoon black pepper
- 1/2 teaspoon cumin
- 1/4 teaspoon ground mustard
Instructions
- Slice off just enough onion stem (non-root side) to make it sit flat.
- Peel onion.
- Place onion on cutting board, cut-side-down.
- Starting half an inch to an inch from the root, cut downward through to the cutting board, making 4 sections first. Then continue to split sections (cut the 4 sections in half, then those 8 in half again) until you have 16 evenly spaced sections, being careful not to cut all the way through.
- Flip the onion over and gently separate outer petals.
- In a shallow bowl, whisk together eggs and milk, water or beer.
- In another shallow bowl, whisk together flour mixture and spices.
- Dip onion into flour mixture, shaking off excess.
- Freeze, petal-side-up, 5-10 minutes.
- Dip onion into egg wash, letting excess drip off.
- Coat a second time in flour mixture, using a spoon to fully coat.
- Freeze, petal-side-up, 30-60 minutes.
- Shake off excess.
- Spritz with oil.
- Place in basket of air fryer and lightly tent with foil.
- Cook at 375 degrees Fahrenheit for 10 minutes.
- Check onion and cook for additional 7-15 minutes, based on size of onion and level of crisp you want to achieve, covering with foil tent if needed.
Finishing touch (dipping sauces)

While the bloomin’ onion is cooking, or in the freezer, you can mix together any or all of your sauce trio options, inspired by the 3 main ingredients in the sauce you find at the restaurant chains that serve this blooming beauty — some spicy, one sweet. You can also make them a day or so ahead of time as long as they’re in airtight containers.
The sauces are all easy to whip up. Just put ingredients into their own bowls and stir to combine.
Because this bloomin’ onion recipe doesn’t need to drain oil like the original restaurant variation, make these sauces as close to serving time as you can. And, if you have extra mixture remaining, it’s easy to get a second one ready too. I’m sure it won’t go to waste!
Spicy ketchup
Ingredients
- 1/2 cup ketchup
- 1 teaspoon Tabasco sauce
Directions: Combine all ingredients in a bowl and stir well.
Avocado wasabi dipping sauce
Ingredients
- 1/2 cup Wasabi mayonnaise
- One avocado
- 1/8 teaspoon lemon juice
Directions: Mash avocado until smooth. Stir in mayonnaise and lemon juice until combined.
Maple dipping sauce
Ingredients
- 1/2 cup vegan mayonnaise
- 2 tablespoons pure maple syrup
Directions: Combine all ingredients in a bowl and stir well, making sure to fold in from the bottom.
Looking for other healthier recreations? Try this homemade Wendy’s Frosty recipe!